The long countdown has started but there are few things that must be completed. Most launch fields have launch cards that must be filled out. Fill these in now and make a special note that this is the rocket’s maiden flight. If it is a great flight, you want everyone to witness it. If it is not a great flight, do not worry, everyone will witness it anyway, and remind you of it for years to come. Look over the rocket one last time and then proceed to take the rocket, the launch card, the igniter, and any special tools with you to the Range Safety Officer (RSO).
The RSO will inspect the rocket and has the final say whether the rocket flies or not. Some of the things they inspect are motor retention, proper recovery device, snug nose cone fit, construction of the rocket, tightness of fins and launch lugs/buttons, and that the center of gravity is correct.
The RSO will also weigh the rocket and verify that the engine that is loaded is safe for the rocket. Once the flight card is stamped with the RSO seal of approval, proceed to the Launch Control Officer (LCO) and verify that it is safe to proceed to the launch pads.
Most clubs have an array of various launch pads ranging from 1/8 inch rods to 1 inch launch rails. Hopefully the earlier recommendation was heeded and the rocket was constructed with rail buttons. Find a launch rail that matches your rail buttons. If not sure, find the pad manager. The pad manager will assist a rocketeer with everything. Accept the pad manager’s assistance and absorb any knowledge and recommendations they wish to share.
Once a suitable launch pad is chosen, lower the rail and slide the rocket on to it.
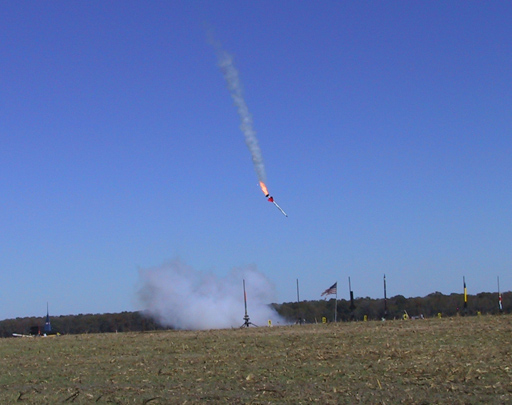
SUCCESS!
Move the rocket back and forth on the rail to ensure that it moves freely and does not bind. Insert the igniter at this time following the instructions for your engine. Slowly raise the launch rail and secure it in the vertical position. Some launch pads have turn buckles to tweak the angle. Note the wind and adjust the angle if desired.
If the rocket has electronics, arm them now. Most electronics have a series of status beeps as they perform the power up sequence. These beeps indicate success or failures. If the beeps are not correct, STOP everything now and rectify the problem. There has been too much effort invested now to jeopardize the entire rocket project on a bad beep. Continue if the beeps are good.
Find the micro clips assigned to the launch pad. Verify that these micro clips are indeed assigned to this pad. If so, rub the two clips together to ensure that that the connections are dead. Connect each micro clip to each lead of the igniter. Ensure that the igniters and/or micro clips are not touching each other or any metal on the launch pad. If satisfied, thank the pad manager and proceed to the LCO. Post the flight card on the appropriate launch pad assignment or give it to the LCO with the launch pad assignment.
There is nothing more that can be done now other then to cancel the flight. Even experienced rocketeer’s stomachs tighten in anticipation of the final countdown. Sometimes that wait can be unbearable but soon, you will hear your rocket announced over the speakers and the rocket will be in flight. Now you have to track your rocket.
Unstable rocket. Not good!